This article was originally written for the Railway Modeller magazine to look at how easy it was to fit a DCC sound system to a small locomotive and in 2007, was one of the first such installations of its type.
37xx Souls of the Departed
I’ve been following the DCC debate for a while on-line, in face to face discussions, and of course in the printed media. From many of the discussion points I could see that DCC did not have significant amounts to offer me, and I certainly wasn’t bothered if I should fall behind, or if I’d be accused of being a luddite, as being espoused by some of the more evangelical style preaching which I’d read or heard from DCC enthusiasts. Having always had an interest in broadcasting and live music, when I started to read in American magazines of ‘sound’ being available, my interest was significantly raised. I guess in our modeler’s book of dreams we’d want steam, sound and weather too. Well here was the possibility of getting at least one of those, all I needed was living proof that it worked and wasn’t gimmicky. The last thing I wanted to do was spend money on something that didn’t match up to my expectations. I was very fortunate that living close to Lincoln there was a local dealer, Digitrains, who specialized in DCC and had significant experience of it, a working layout to see, and for me, critically, in this leap of faith, to hear.
A visit to them left me in no doubt that sound was worth investigating further. To do this, one step that I had to consider, was going DCC and with what. I wanted a simple to use and set up system with high specification at reasonable cost. Primarily to fit and function test chips once they were installed. My brother coming over from Kansas on a business trip brought an unexpected surprise, an NCE Power Cab DCC controller, as a surprise gift. So I now had my ‘control’, but nothing to run with it! The last thing I wanted to do was convert my layout over to DCC and not be able to run the majority of my locomotives, due to the cost of putting chips in them. Whilst watching a demonstration of programming chips at the shop I was taken by a rolling road they used, and I realized that this would be very useful, for testing and running in locomotives, but would also allow me to play with DCC before committing one way or another to it.
The Bachmann 97xx is an cracking example of current ready to run products, for most modelers the locomotive is excellent straight from the box, and I have to admit until recently, for me, that was the case too. Like many of us I’d do a little more to it to customize it, and then it’d join my stock on the layout whirring backwards and forwards as it went around it’s allotted shunting and branch passenger or local freight services, a real local hero. I’d seen in much of the DCC debate the scales here in the UK were, and at the time of writing early 07, still are tipped firmly in the direction of diesel powered locomotives rather than steam. Because I have a wide range of interests, steam sound was important to me as my layout is operated in one of its phases in the BR steam or transition era, therefore I chose steam as the introduction to DCC sound.
Having looked at DCC sound diesels it was clear that there are usually relatively easy ways of locating a speaker in the locomotive inside them without too much hassle, likewise with a tender loco the task is also relatively easy in terms of finding space. My specific interest was to get sound into a 97/57xx pannier, as I have a couple of them for a latent idea to do a Forest of Dean layout, having been inspired on many an occasion by the photographs of Ben Ashworth in particular. A little bit of research uncovered South West Digital (SWD), whom in their range included a 2-cylinder GWR steam sound chip, recorded on the West Somerset Railway from a Manor. (SWD reference number 520GWR) so I had a chat with them to determine which chip and speaker combination would be the most appropriate for me to try. The chip which we determined to be the best to try was the ESU LokSound Micro, which was duly ordered and arrived very promptly. The loco selected is the ‘DCC ready’ version of the Bachmann pannier. This is subtly different inside to the regular model in that the boiler weight has been reduced in size to allow the easy installation of a DCC chip.
The body is easily removed for access to the chassis, first take the couplings off and unscrew the body from the chassis at either end. On the top of the chassis you will see the DCC blanking plate for analogue operation, this needs to be removed, keep it safe if you need to covert it back at some time in the future.
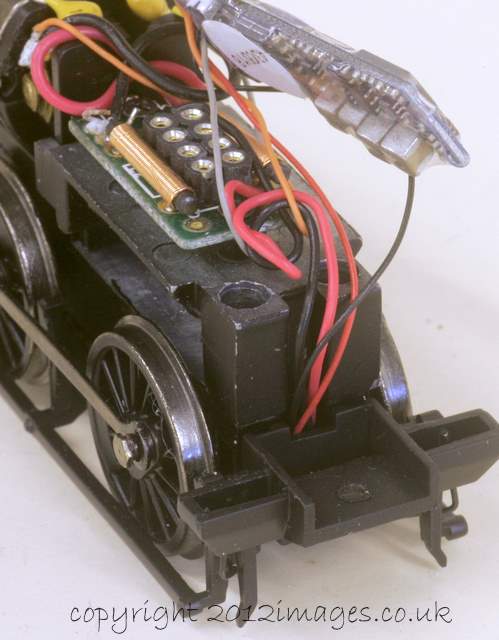
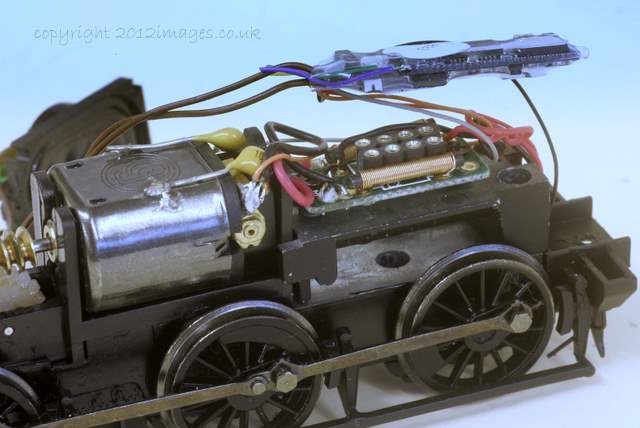
The chip comes with a comprehensive instruction leaflet, including the fitting instructions. This is a very simple installation as the loco does not have lights, externally or internally, and will be hard wired into the loco. This simply means I’ll attach it directly to the motor pick ups and the motor terminals rather than via a multi pin DCC connector to the DCC board on the chassis. To access the loco pickups there are two screws underneath the loco unscrew these and the keeper plate drops away which has the pick ups attached to it. There is a simple rhyming verse which will help here, in attaching the wires from the chip.
‘Red and Black to the track, orange and grey the other way’.
So attach the red and black wires to the pick up strip, red to the right hand side and black to the left hand side. A very quick touch of a soldering iron is all it needs with one wire connected either side of the pick up strip as above. The other two the orange and grey need attaching to the pick up terminal on the motor frame. Not a problem on this loco, but you must always make sure that the orange and grey wires only touch the motor connections.
If they have electrical contact with the chassis or wheels then you will have big problems and potentially need to replace the chip, which in this instance costs more than the locomotive! There is a yellow capacitor which needs to be removed, this is easily done with a pair of sidecutters. You will now have your loco DCC sound chipped! At this point place it on your programming track and check the functions work. With a rolling road as I have used you can check the ‘moving’ sounds, like chuff rate for this loco or diesel throttle acceleration and deceleration, but I’d suggest leaving getting into that until a little later. Probably one of the next thoughts going through your mind is, ‘this’ll never fit in that’. Well it does, and we will now turn our attention to the body modifications required, which are very few.
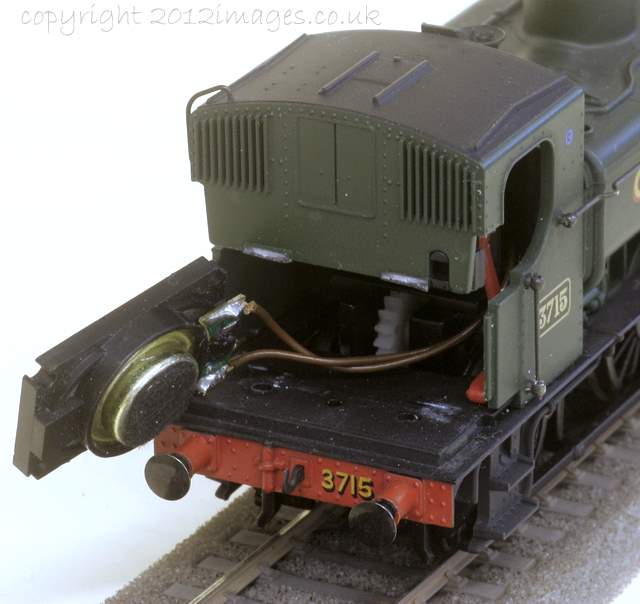
The loco is available as a low (early) and high (late) cab variant, the type illustrated is one of the late variants but the process is the same for either. We will be fitting the speaker into the locomotives coal bunker, it can be fitted into the cab, but unfortunately is visible from many normal viewpoints. By undoing the two retaining screw underneath the bunker the back of the bunker and the weight simply lifts out. To make this installation as simple as possible, we won’t get into swapping speakers, I’ll just use the chip as it comes. The weight will have to be discarded which means losing 25g of weight. My loco still pulled six Bachmann Bullied coaches afterwards with no ‘ill effects’, so don’t worry unduly
about losing weight from the loco.
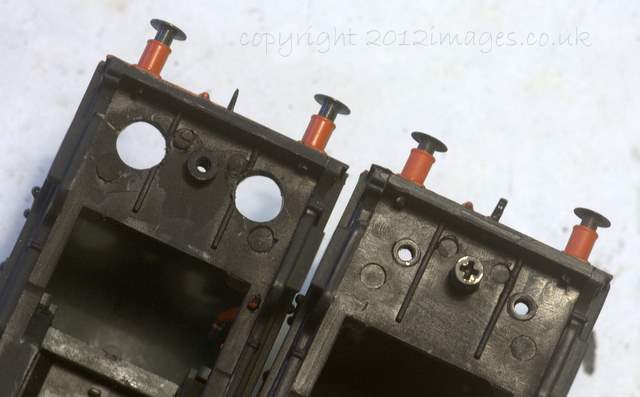
The bunker has a floor which needs to be removed to allow the speaker to fit, I cut this out by scoring around the edge with a Stanley knife, and cutting slits with razor saw until it would break free, the rough edges being dressed with a file. The bunker will still fit on the loco as an interference fit, but as we have removed the mounting holes, when we refit it, it will need to be fixed with PVA glue or similar which will hold it in place but allow removal if need be. At this point test fit the body. The chip will lie on top of the chassis in front of the motor. As you fit the body be careful to thread the speaker wires around the motor so they enter the cab at the bottom of the backhead by the floor. There is sufficient space to do this, even if a little bit fiddly.
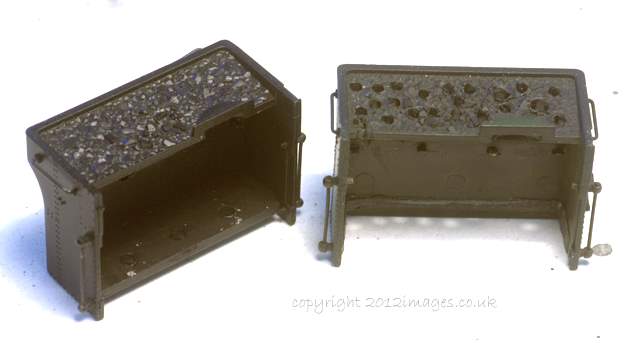
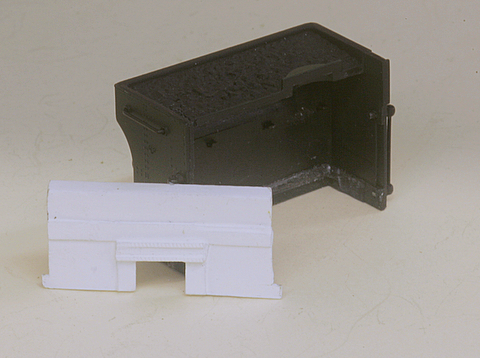
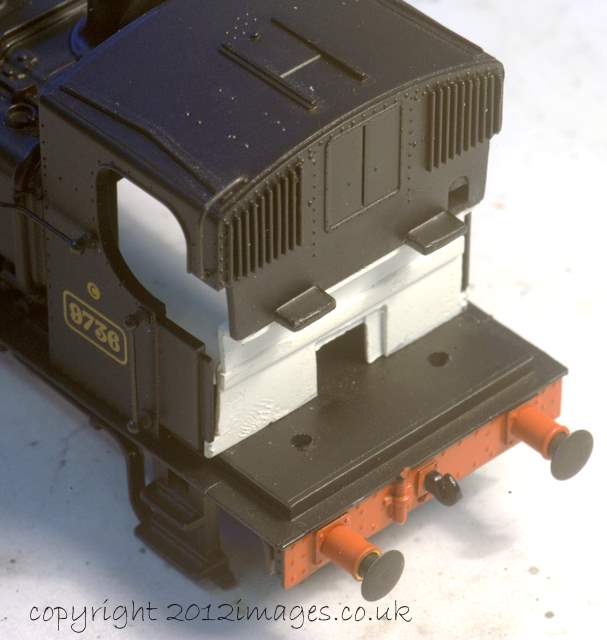
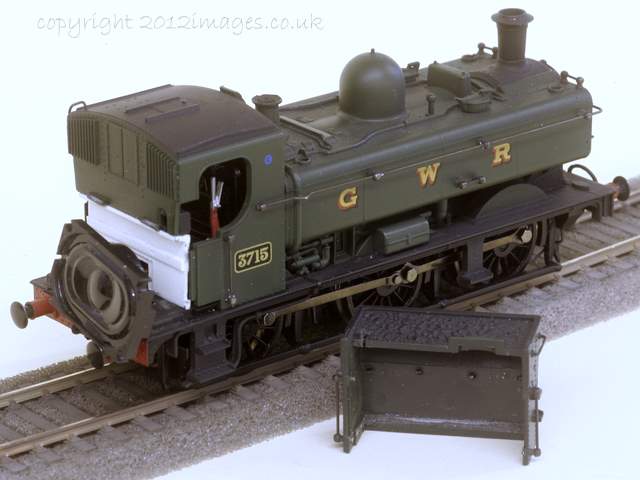
At this stage you can press fit the bunker and get a good idea how the speaker fits and indeed run it to see what it sounds like. At this stage the sound will be quite a full sound as in reality the speaker in not enclosed. I wanted to get a better appearance so I made a replacement bunker front out of scraps out of plasticard, and left the coal door open for the wires for the speaker.
See the photo showing the white bunker front and green bunker, a picture after all speaks a thousand words!
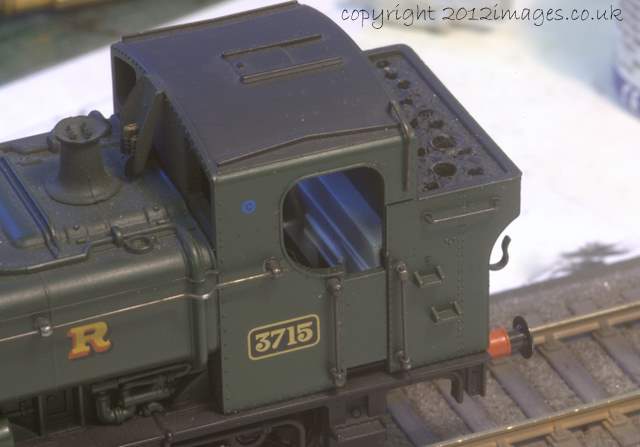
Once I had done this and fitted it, again made as an interference fit the sound changed completely, being less in volume and a considerable amount of the bass sound had gone. Clearly the sound had to escape, and I had to think of a way to do this effectively whilst keeping the speaker hidden. The first thing I did was to drill hole in the coal load in a random pepper pot type of style of 1.5 to 2mm drill size. This had an improvement releasing more bass tone to the noise, and it dawned on me that the original mounting holes for the bunker were not required and these could be opened out too. I did this in stages listening for the change in tone and volume as I did so, using different size drills, increasing them gradually in size and eventually stopping at around 7mm diameter on each side.
This prevents the hole appearing in the cab floor, and retains the original chassis mounting point too. At this point the sound had changed again to a nice ‘full’ sounding noise, with no significant bias to tone or pitch. The sound installation was now complete, a very quick and simple fit for my first DCC sound loco. I was very fortunate in that the ‘chuff’ synchronization was spot on for the loco, the loksound instructions provided with the chip give details on how to synchronize the wheel/chuff rate if you need to.
I was very pleased with the relative simplicity of this installation, whilst not ‘plug and play’ its pretty close and anyone who takes a bit of care with a soldering iron will be able to manage this installation in a couple of hours at most. At this point it is just the final touches to complete. The loco and body can be reassembled and the bunker front attached with a dab of PVA as can the bunker. The speaker will be held in place by these two, and the PVA or similar can be broken easily if access is needed to the speaker or to remove the body from the chassis. The only thing that now ‘jars’ is the pepper pot coal in the bunker. It doesn’t take much effort to place coal around the holes making sure they are not blocked and the loco is ready is ready for traffic!
So now it was installed what is it actually like? Well the running has no noticeable improvement in terms of controllability than my existing DC system, a 20 year old Hammant and Morgan Walkabout. The inertia works well, certainly with my NCE power cab and is easy to configure, and adjust settings.
The sound is, in the main, very pleasing. The volume even at maximum power is not particularly loud, I don’t have a problem with that, it’s sort of scale sound if that makes sense! The recordings are very clear and there’s no noticeable distortion of them in this particular configuration. Having heard it myself I wanted others opinions of it, and to this end took it to a couple of shops and also to a few friends houses for them to hear it too. The reception of it has been very positive, particularly as sound in general has previously only been fitted in larger 4mm locos, for those in the trade and at the small meeting I took it too, had not seen sound in a loco this small. Those that had seen sound in BR Class 08’s commented that it was nice to see that the speaker was hidden. I got the most reaction from my daughters, who were really taken with it, one of whom has insisted on showing dads toy train to her friends. Again her friends too thought it was ‘really cool’, which I’m led to believe, translates to, its good!
This is my first step into DCC, but on my layout apart from the sound, the DCC has no advantage over traditional DC control. This is because my layout is designed for one engine in steam operation, so all tracks are live anyway, and the quality of control that’s available from the Walkabout, some 20 years on, is still remarkable. I can see significant advantages with DCC if you have a layout with double heading, a large MPD, or simultaneous movements, where the ability to move a loco independently or combined then DCC will be a useful tool indeed. It’s certainly been an interesting conversion and experience. The biggest disadvantage at the moment is the cost, which in time may come down if the market increases. This installation with just the locomotive and the sound chip has a cost in early 2007 in the order of £140.00.
On the following comments I’m bearing in mind that the recording are from a Manor, and therefore not a true recording of a small pannier. Within the sound files there are three whistle sounds, a single toot, and two longer whistles. Both of the longer recordings are similar, I’d have preferred to have a longer single tone whistle, and perhaps a double toot. The hisses and gurgles of safety valves and cylinder drain cocks are well captured, as is brake squeal. The brake squeal is only available within the deceleration phase and again it would be nice to have that as a separate sound file to select. I don’t know how much of the capacity of the sound files within the decoder are used, but it’d be nice to see a wider variety of sounds to select. If the decoder is full, of those sounds currently included, I’d be happy to lose the shoveling sound or coupling ‘clank’ in exchange for a different whistle or separate brake or flange squeal sound.
Having said that, the quality of the recordings and the decoder make this a very effective installation, and certainly something different. I wouldn’t change to DCC on the basis of this exercise, I’m fortunate in that my layout as configured works as both DCC and DC by changing the controller over. It has caught my imagination though and I have another steam loco at the moment on the ‘sound’ work bench.
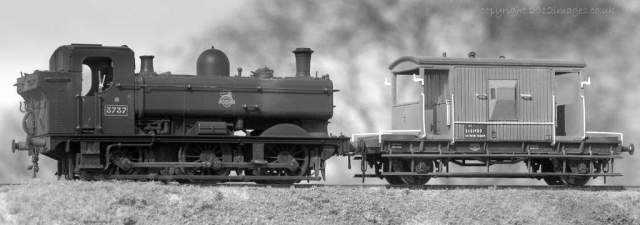
I like to weather my models, and this would be no exception. I had already got an idea from a good number of references as to how this loco should look, in particular ‘Steam in Dean’ from the Lightmoor Press, ISBN ref No. 0 899889 06, a stunning collection of photos from Ben Ashworth, with plenty of atmosphere of that area and era.
All that was needed to complete the loco was for me to choose a replacement number, 3737, which was a loco that worked in the Forest of Dean area. Long since departed, but with sound, something of it’s soul had returned.

A very interesting article. I have to say that to date I have found DCC steam sound most disappointing, lacking the depth of the real thing, you know, the deep throaty roar. Maybe it’s something to do with it’s installation in the model or that the settings need adjustment. To me it almost sounds like someone going chuff-chuff themselves. I would be interested to know how you managed to achieve a sound to your satisfaction.
I didn’t. The sounds that I got from the Panniers were ok, but due to the size of the speakers had little base, let alone all the right junk in all the right place. The sounds were synchronised to wheel revolutions too so that it was as real as I could get it with what was available. It was carried out probably six years or so ago, just as UK steam sounds started to be recorded. I’ve not carried out any more sound work, recordings are ok but not particularly inspiring and to me you rapidly notice that the only sound is coming from the engine, no where else. That element is of interest, and two locos in the works at the moment may get a sound system added, and then I’ll look again at ambient sounds. But DCC sound hasn’t grabbed me big style at all.
I think that sound has moved on since 2007 when this article was published. The fitting guidance is still very helpful though. I now have 11 locomotives with sound, both steam and diesel, and am now about to fit a sound decoder to a Bachmann pannier tank locomotive. This I think will be the biggest challenge yet. I have come to love and trust the Zimmo decoders from Digitrains in Lincoln who have a large library of sound recordings. The F2 on Zimo decoders is for breaking which helps the “driver” to slow and stop the loco’ like the real thing – regulator shut, apply breaks. Great realistic sound too.
Whilst I love my loco’ sounds I am apprehensive about tackling the pannier.
Jeremy at Digitrains is a mine of useful assistance. You’re correct that much has moved on, not least chip size and speaker quality and size. I think it may be a bit easier now because of those factors, and today I’d try and add a ‘stay alive’ too, they weren’t even a ‘thing’ when this was done! Please let me know how you get on 🙂